How to Install Snipe IT on CentOS 7
Snipe-IT is a free and open source IT asset management system with powerful built-in features. It is a Free Open Source (FOSS) project built on Laravel. Snipe-IT is very user-friendly and ideal for IT operations like asset tracking (who has which laptop and accessories), handling software licenses, network devices, other peripheral accessories, when it was purchased, warranty expiry etc.
Requirement
- HTTP server running Apache
- PHP version >= 7.2.5 (7.4 is recommended)
- PHP Extensions - mysqli, gd, imap, json, mbstring, xml, pdo, openssl, curl, ldap, zip, bcmath, mcrypt, tokenizer, fileinfo, dom
- MariaDB database equivalent >= 10 (10.4 is recommended)
Update System
sudo yum update
Install Basic Packages
sudo yum install vim git composer
Change SELinux mode to Permissive
Edit the /etc/selinux/config file as follows and reboot the system
sudo vim /etc/selinux/config
# This file controls the state of SELinux on the system.
# SELINUX= can take one of these three values:
# enforcing - SELinux security policy is enforced.
# permissive - SELinux prints warnings instead of enforcing.
# disabled - No SELinux policy is loaded.
SELINUX=permissive
# SELINUXTYPE= can take one of these two values:
# targeted - Targeted processes are protected,
# minimum - Modification of targeted policy. Only selected processes are protected.
# mls - Multi Level Security protection.
SELINUXTYPE=targeted
Install PHP
For installing PHP 7, EPEL and Remi repository need to install and enable on CentOS 7 system with the below commands.
sudo yum install https://dl.fedoraproject.org/pub/epel/epel-release-latest-7.noarch.rpm
sudo yum install http://rpms.remirepo.net/enterprise/remi-release-7.rpm
Install yum-utils, it is a collection of tools and programs for managing yum repositories, installing debug packages, source packages, extended information from repositories and administration. Use the yum-config-manager program to enable Remi repository as the default repository for installing PHP 7.4 version.
sudo yum install yum-utils
sudo yum-config-manager --enable remi-php74
Install PHP and the required extensions.
sudo yum install php php-openssl php-pdo php-mbstring php-tokenizer php-curl php-mysqlnd php-ldap php-zip php-fileinfo php-gd php-dom php-mcrypt php-bcmath php-xml
Configure the timezone in php.ini file. Uncomment date.timezone = and enter the respective timezone.
sudo vim /etc/php.ini
date.timezone = Asia/Kolkata
Install Apache
sudo yum install httpd
Start and enable the Apache services at boot time.
sudo systemctl start httpd
sudo systemctl enable httpd
Install MariaDB Database
By default CentOS 7 base repository provides MariaDB 5.5 version, which will work for Snipe IT Asset Management application. But in this tutorial, we will install the latest version of MariaDB 10.4
Create repo for MariaDB 10.4
sudo vim /etc/yum.repos.d/MariaDB.repo
[mariadb]
name = MariaDB
baseurl = http://yum.mariadb.org/10.4/centos7-amd64
gpgkey=https://yum.mariadb.org/RPM-GPG-KEY-MariaDB
gpgcheck=1
Install MariaDB and its dependencies
sudo yum install MariaDB-server
Start and enable the MariaDB Server services at boot time.
sudo systemctl start mariadb
sudo systemctl enable mariadb
Configure MariaDB
sudo mysql_secure_installation
Create Database and user account for Snipe-IT
sudo mysql -u root -p
create database snipeitdb;
create user 'snipeituser'@'localhost' identified BY 'Linuxyogi@123';
grant all privileges on snipeitdb.* to snipeituser@localhost;
flush privileges;
Install Snipe-IT
Clone the latest stable release of Snipe IT to new document root directory called "snipe-it".
cd /var/www/html/
git clone https://github.com/snipe/snipe-it snipe-it
Configuration
In this section Snipe-IT configuration file need to configure, such as your database credentials, mail server, preferred language, timezone, and so on. Some of the settings are optional, some are required.
All system configuration variables are stored in a single .env file. To get started, rename the .env.example file to a new .env file:
cd /var/www/html/snipe-it
mv .env.example .env
sudo vim .env
APP_TIMEZONE='IST'
DB_CONNECTION=mysql
DB_HOST=127.0.0.1
DB_DATABASE=snipeitdb
DB_USERNAME=snipeituser
DB_PASSWORD=Linuxyogi@123
DB_PREFIX=null
DB_DUMP_PATH='/usr/bin'
DB_CHARSET=utf8mb4
DB_COLLATION=utf8mb4_unicode_ci
MAIL_DRIVER=smtp
MAIL_HOST=smtp.office365.com
MAIL_PORT=587
MAIL_USERNAME=support@linuxyogi.com
MAIL_PASSWORD=XXXXXXX
MAIL_ENCRYPTION=null
MAIL_FROM_ADDR=support@linuxyogi.com
MAIL_FROM_NAME='Snipe-IT'
MAIL_REPLYTO_ADDR=admin@linuxyogi.com
MAIL_REPLYTO_NAME='Snipe-IT'
MAIL_BACKUP_NOTIFICATION_ADDRESS=admin@linuxyogi.com
Install Dependencies
Composer is a package manager for PHP that allows to manage the dependencies for the various vendor packages utilize in Snipe-IT. Vendor packages are PHP libraries that someone else wrote, and that are use in Snipe-IT to help make it awesome.
cd ~
sudo curl -sS https://getcomposer.org/installer | php
mv composer.phar /usr/local/bin/composer
cd /var/www/html/snipe-it/
composer install --no-dev --prefer-source
Generate the App Key
php artisan key:generate
php artisan migrate
Change the ownership and permission on support directory.
chown -R apache:apache storage
chown -R apache:apache public/uploads
chown -R apache:apache bootstrap/cache
chmod -R 755 storage
chmod -R 755 public/uploads
chmod -R 755 bootstrap/cache
Allow http and https services from Firewall for Snipe IT web installer and Dashboard access.
sudo firewall-cmd --zone=public --permanent --add-service=http
sudo firewall-cmd --reload
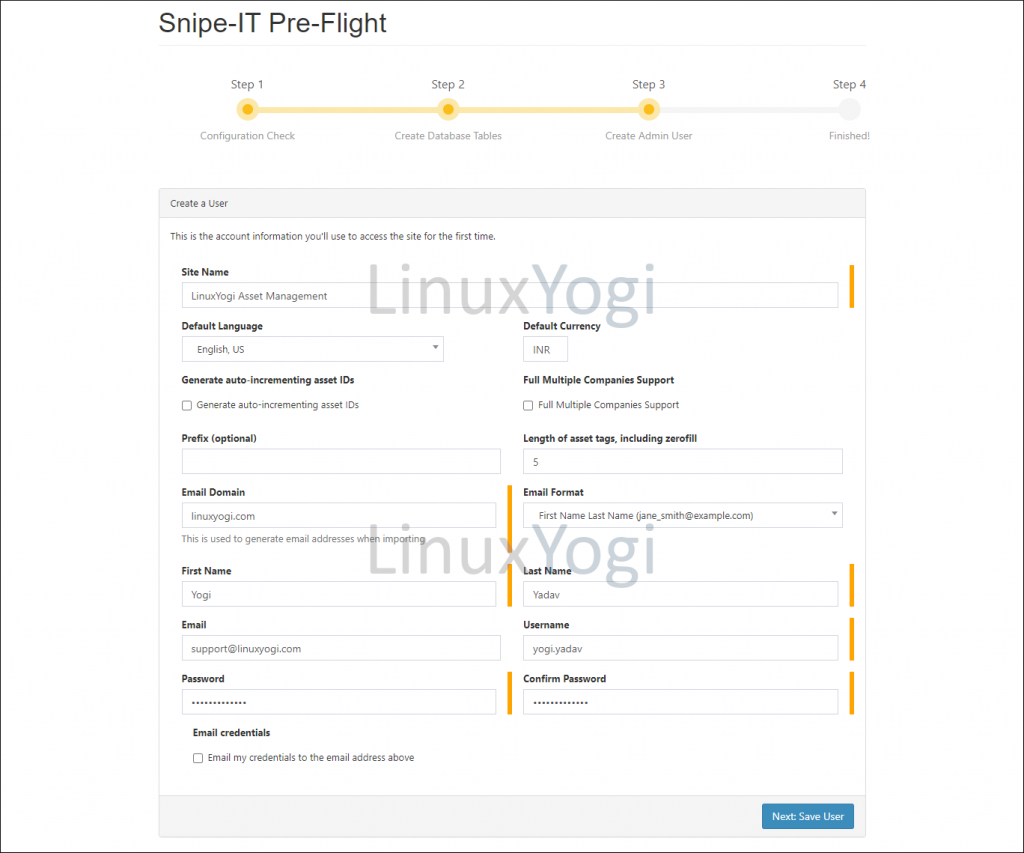
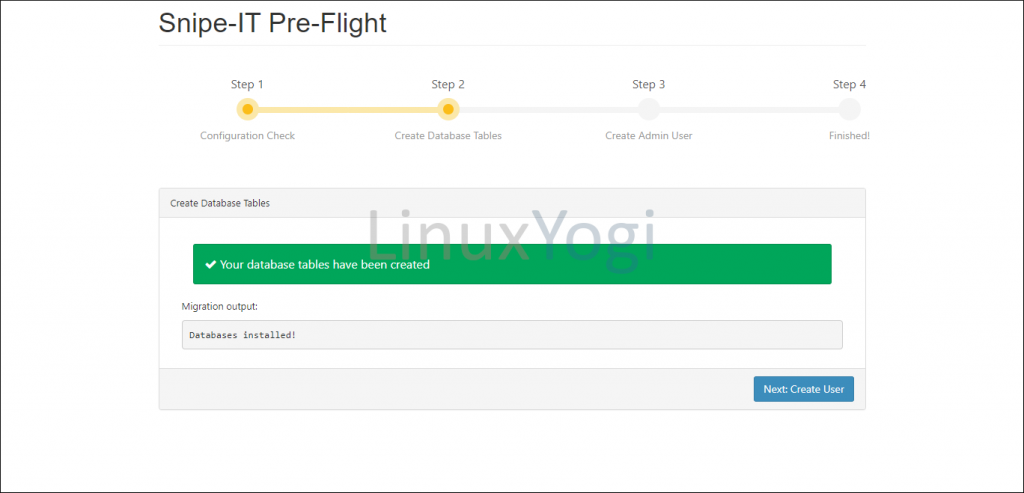
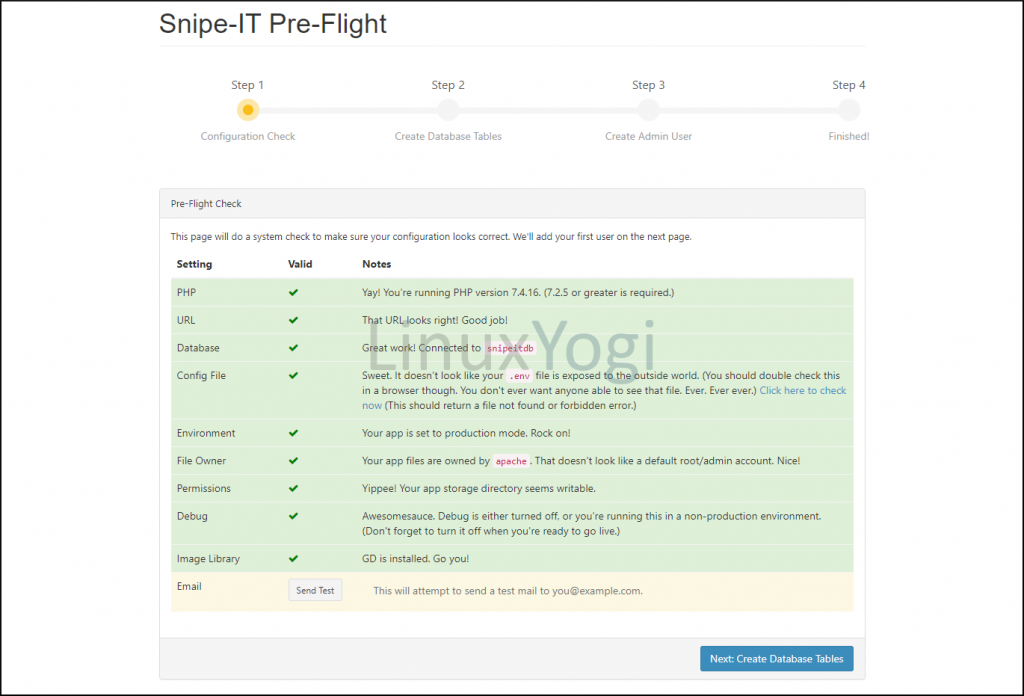
Open browser and navigate to http://<server-ip>/ and make sure all prerequisites are marked green. Click Next.
example- http://10.0.0.15/
Create admin user and fill the account information like Site Name, Language, Currency, First Name , Last Name, email id, email domain etc.
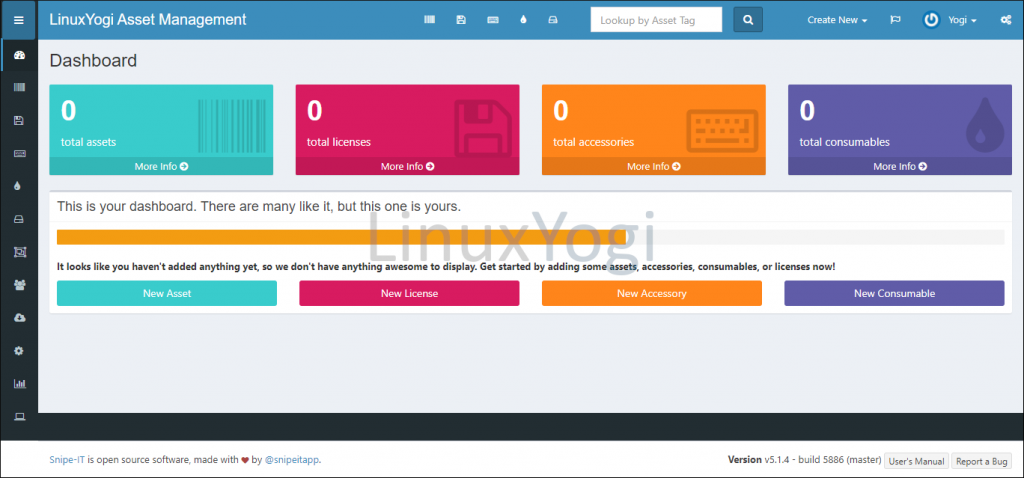
Dashboard is ready for the use.